Sunday, January 27, 2013

Newborn Photography Session

As a part of my new business, The Creative Cottage, I have included photography in my services. I just recently branched out and had my first infant session this morning. I have always been nervous to try an infant session because they are a bit intimidating. Since Pinterest has come around, you will find hundreds of infant session examples and they are all SO amazing. Thankfully I was very happy with how my photos turned out and wanted to share them with you all today. I hope you enjoy them!  


 photo pinkbackground_watermark_zpsf16685fd.jpg


 photo rogers1_zpsbac50d43.jpg


 photo rogers3_zps367412bb.jpg


 photo rogers9_zpsfe0e6098.jpg


 photo rogers6_zps4966a4d3.jpg


 photo rogers5_zpsd26a9b7e.jpg


 photo rogers4_zps25420fc4.jpg


 photo rogers7_zps13e1c122.jpg


 photo rogers8_zps545eaf77.jpg


 photo rogers11copy_zps3b820c7e.jpg


 photo rogers10_zpsd213545c.jpg


Hope everyone had a wonderful weekend:)


Friday, January 25, 2013

Bedside Drawers Makeover

Since we have moved into our new home, I have been working on a few furniture makeovers to fit our space just perfectly! My first makeover in the new house is a piece of furniture that I have had my whole life and is actually older than me!

It has been painted many different colors over the years, and my mom even told me that it used to be a pale yellow and sat in my room when I was a baby! I then brought it along to college with me, painted it black and switched out the knobs. For the past few years it has sat in our guest bedroom in the semi-gloss black that you see below. For the new house, I wanted to switch it up a bit and give it a little makeover. I was going for something lighter and brighter to keep the room neutral - rather than the semi-gloss black paint I had used previously, I went with a grey matte color and sanded the black through. I'm so happy with the final product! I feel like the new color makes the glass knobs just sparkle! What do you all think?


 photo before_after_zps02826354.jpg


 photo drawers_zps2dd1ca3c.jpg


 photo drawers3_zps965d84e1.jpg


 photo drawers4_zpsd31c5848.jpg


 photo drawers6_zps4de2f8fd.jpg


 photo drawers5_zpse09e4049.jpg


 photo drawers2_zpsdcc830cf.jpg


Hope you all enjoyed! If y'all are wondering where to find the knobs, you can find a few different options at places like Lowes and Home Depot. I think they range anywhere from $3-5 per knob. Not too bad, right??


Tuesday, January 22, 2013

Mean comments? No thank you!

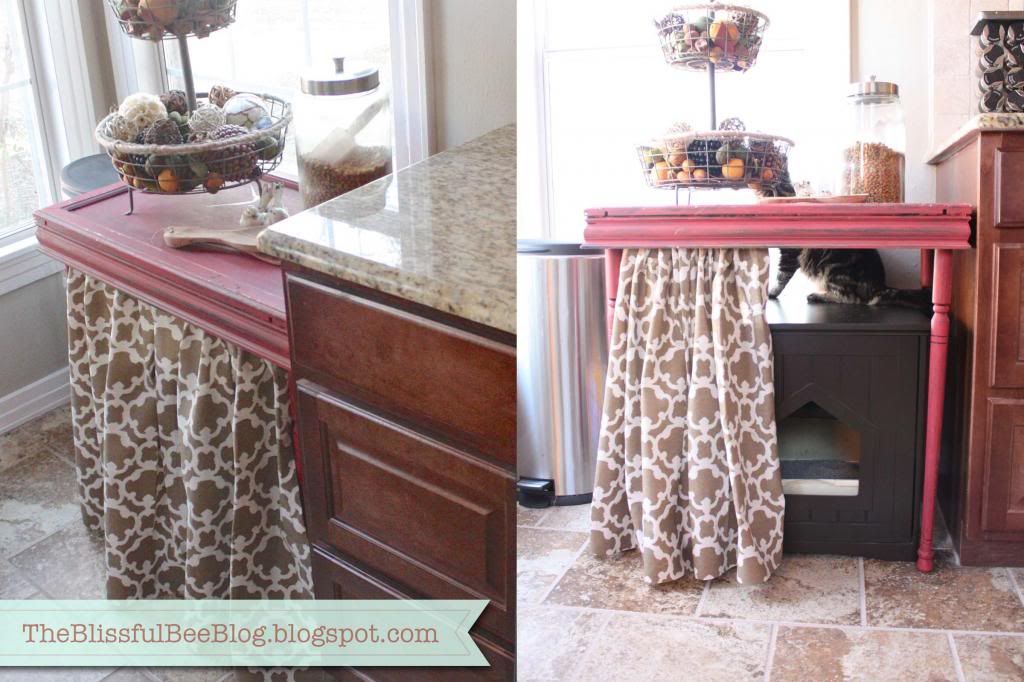
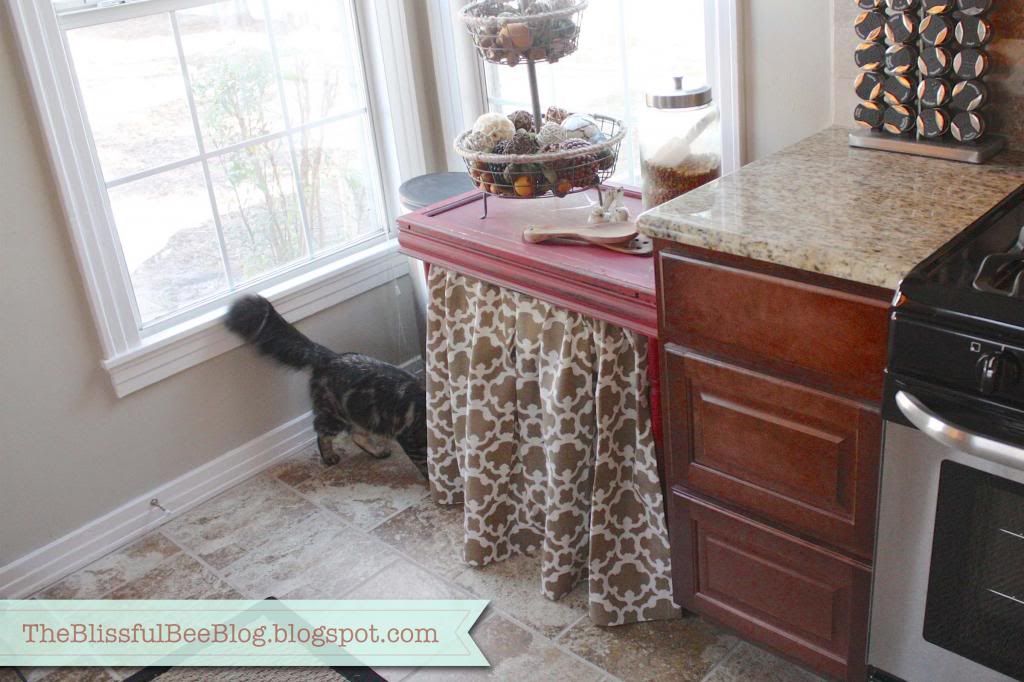
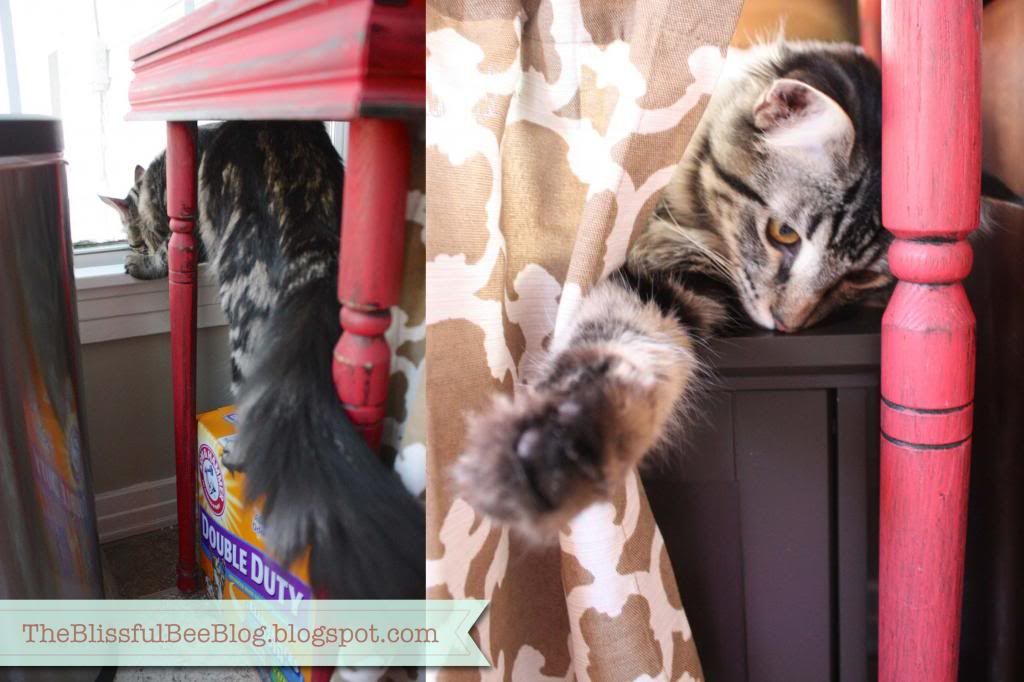
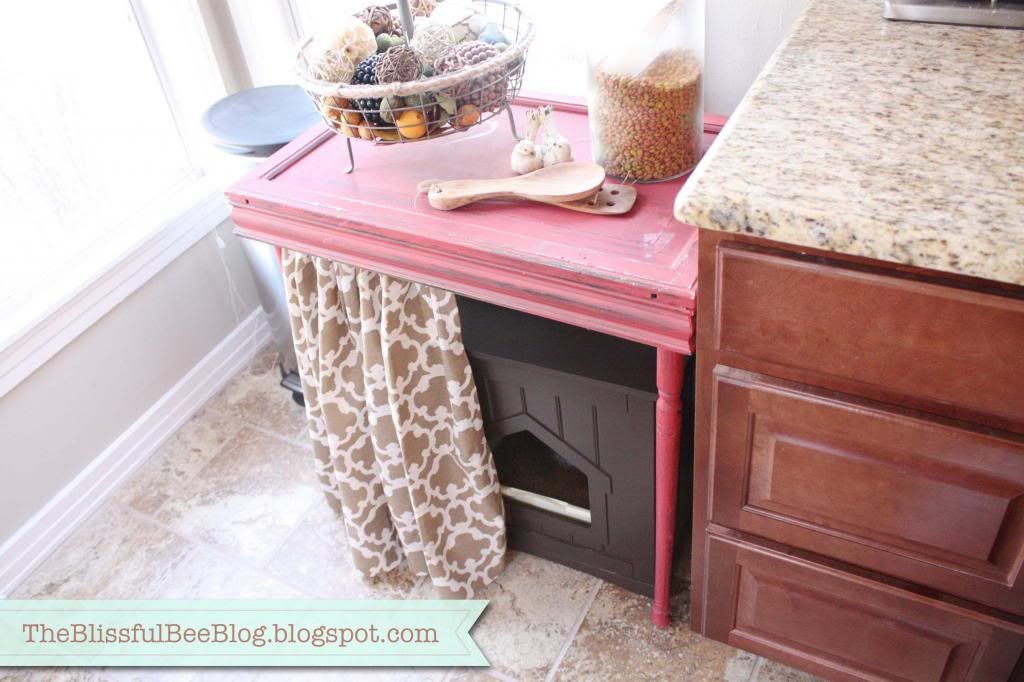
Since I have started blogging I have noticed a few fellow bloggers write about how they sometimes will get the occasional "bad" comment. It might not be mean, it might not be rude, but it also might not be... well... helpful or nice. Which, in my opinion, why say something at all if you don't have something nice to say? We bloggers take a lot of time out of our day to document and post about what we love. (And most of the time we are doing it for FREE) It might appear to take just 5 minutes to whip out a post, but it doesn't. Thankfully all of my amazing followers here at The Blissful Bee have been so wonderful and I seriously can sit here and say I have not yet had ONE bad comment. But... venturing out and posting my projects on other websites {ones that will remain un-named} I have recently received a mean comment... And from what? My most recent post - my kitty litter box Hide-A-Way. 


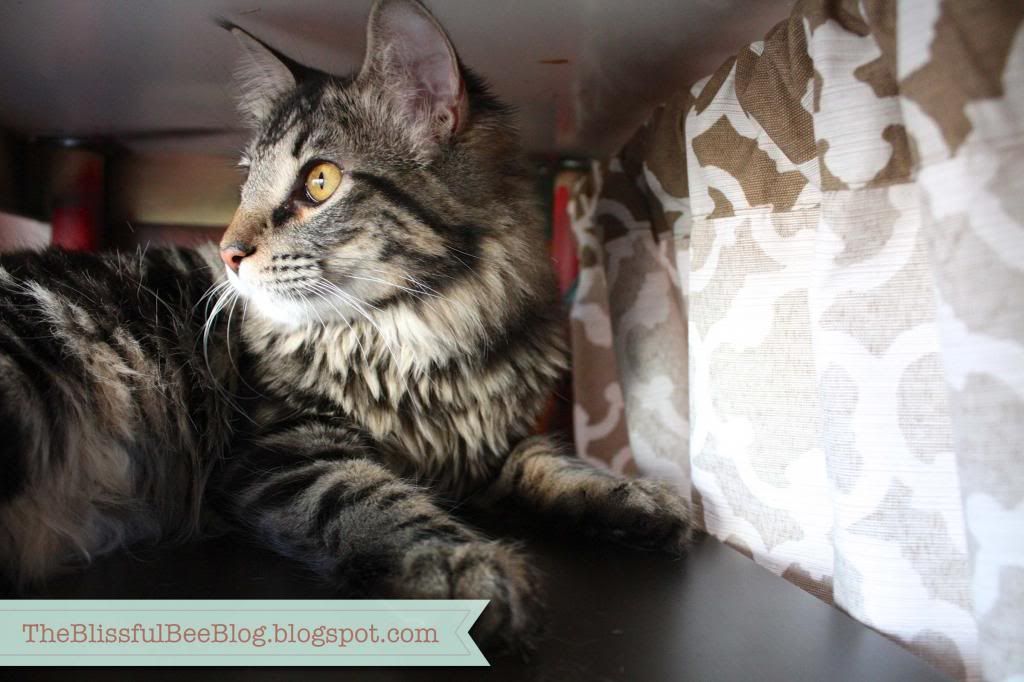
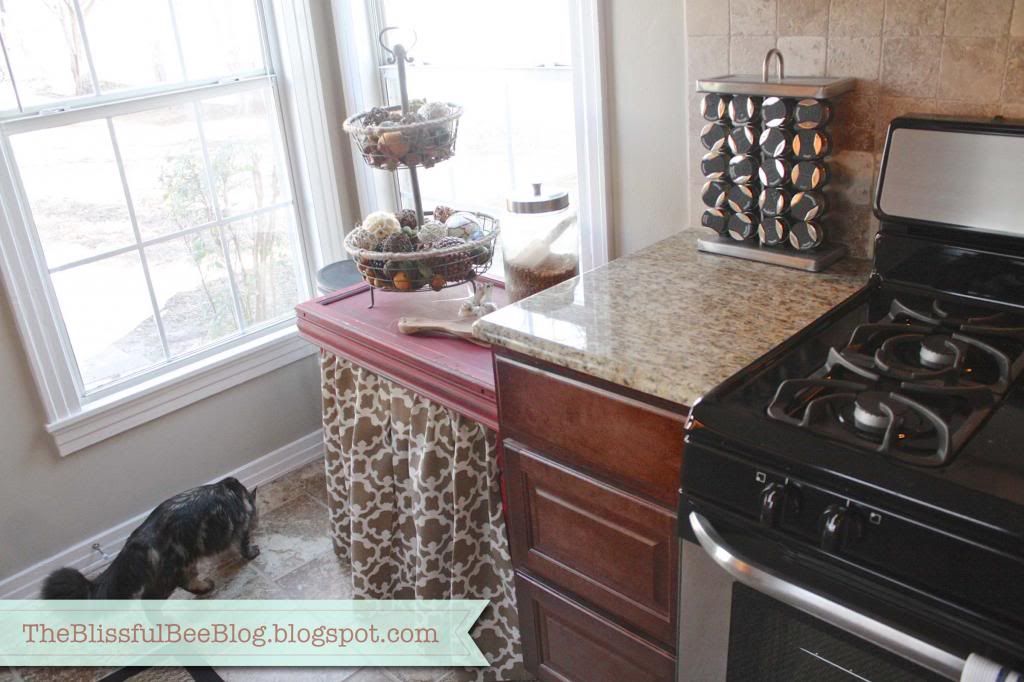
The first comment - not bad at all. The second comment - again, not too bad either. I'm a big girl - I can take a punch here and there. The third comment... well that just ticked me off. And sadly... as much as I wanted to be the "bigger blogger" and not comment back... as you can see, I did comment back. And well folks... I got snappy. The sarcastic smart alec in me came out and it got ugly. Yupp. I caved and wrote exactly what I thought at that exact moment in time. Maybe I shouldn't have, and I will probably feel bad about it in the morning, but it just really hurts when you throw yourself out there and get not just negative feedback, but rude and unnecessary feedback. Especially when they're talking about my sweet kitty as if she's some rabid animal! Oh, and also as if I don't clean my kitchen or something?? Look, I understand that the kitchen was not the ideal location for her new "home," but when you're given very limited options (aka no other options at all), then you gotta work with what you got. My sweet Bailey is completely worth it, and if I have to put her litter box in the corner of our kitchen, well then I'm fine with that. She has brought us so much joy and I couldn't imagine not having her as a part of our family.

And that is beside the point anyways - I will never understand comments like that. I understand that when you put your work out in the public, people can write what they want. I get that. I'm even risking that right now as I write this post. But why waste your time writing something borderline RUDE and just simply unnecessary?? Are they thinking I will all of a sudden learn from what they wrote and move the litter box into my imaginary spare "cat room" that I have lying around? No. I won't. Because if I had ANY other option at all, I would have taken it. Ok... getting riled up here again. Sorry guys! Deep breath! 

{dramatic pause....}

Ok ok I'm good now. Anyways, now that I have vented a bit maybe I will feel better about negative comments. I guess it was bound to happen sometime! I just need to remind myself that for every negative comment, there are always 5 positive comments that go unwritten. I almost deleted my post on that {un-named} site because I was so mad/embarrassed, but I then saw how many people were reading the post and that a lot of people hopefully found it helpful. I mean, isn't that why we bloggers blog? To help our fellow DIYers??

Have any of you encountered negative comments? Do you get bothered by them as much as I did/do? Like I said before, constructive criticism is always good to have, but when does that cross over to just plain mean? 

I sure hope everyone is having a wonderful week so far!! Minus my {bitter post} here tonight, my week has been wonderful. The new business is up and running, the new house is coming along wonderfully and I couldn't be happier! Also, you might have noticed The Blissful Bee got a little facelift this week. Hope you all are enjoying the new look:)


Friday, January 18, 2013

Hide-A-Way Kitty Litter Box


So I want to start out with saying that I am completely aware that by posting about a {Hide-A-Way kitty litter box} that I am knowingly walking into "crazy cat lady" territory... Yupp. It just happened. I will say though that I do think this post could be quite useful for any cat owners who might want to live stylishly AND have an indoor cat. Yes people, it's possible. Let me show you how.

Since we have moved, we had to find a new home for our sweet kitty {Bailey's} litter box. We don't have a large laundry room like we did in the previous house, so I had to get creative! Unfortunately the only place we were able to put her "bathroom" was in our kitchen. EW, right?!? Well don't you fret, because I've got a solution.

Since we adopted little miss Bailey back in May, we bought the best little purchase EVER from good ole Wal-Mart. It's a litter box that represents a piece of furniture compete with an adorable little door that I can change out her "business" and she can walk in and out to... well... ya know... DO her business;) At only $49, it is one of our best buys yet! It hides 98% of the smell, and at the same time hides all that nasty stuff we don't want to look at. 


 photo 2013-01-18115824am_zpsee7e79a4.png
You can find it {HERE} at walmart.com

So now you might be wondering how to recreate the rest of Bailey's "Potty Mansion" as I like to call it. Well it's quite easy and I am here to show you how. All is takes is just a few items and a few short steps. 


 photo whatyouwillneed_zpsb33cbd18.jpg

You first need to start off with some sort of decorative table that is open underneath. The table I used is something my Dad and I built years ago out of an old cabinet door. But no custom build is needed for this project - anything that has an open bottom will work. You also don't need to have the $50 litter house from wal-mart - it's great to have to hide the smell, but it's not needed. I love using it because with the door on the kitty house, along with the curtain on my tutorial, there is NO smell at all. It's awesome.

Moving on! Basically what you need to do first is measure how wide your table is from leg to leg. Once you know your width, you can then purchase your spring rod - I found mine at target. I also purchased my curtain panel from Target as well. Next, measure how long you will need your curtain to hang down and cut your length about 3 inches longer than where it will hit the ground. (you will be "iron hemming" the panel, so you need extra fabric to fold under.) Once you have the curtain cut to the correct length, you will then "iron hem" your curtains to the exact length you previously measured. I found my iron-on adhesive tape at Joann's for like $2. The "ultra hold" is what the lady recommended at Joann's and it worked great! After my curtain panel was all hemmed up, I fed it through the spring rod. Now all that's left is to install it along the front of the table. And since we're using a spring rod, it requires... well... no installation! Just put in place, and your good to go! 

You can also place the curtains along the sides of the table, but I haven't found a need to yet. My table is placed in my kitchen where you don't see the sides or back, so it works out nicely. I also thought I might have to leave the curtain partially open for Bailey to know where to go to the bathroom, but luckily I was wrong. Turns out cats are pretty smart and she simply slips right through the small opening of the curtain while keeping it completely closed. Yippee! 


 photo litterboxhouse5_zps81cac575.jpg


 photo litterboxhouse2_zpsbd28bc83.jpg


 photo litterboxhouse3_zps1b7318cd.jpg


 photo litterboxhouse4_zpsc6c0ac16.jpg


 photo Bailey_zps2183f46c.jpg


 photo litterboxhouse_zpse5c65a1b.jpg


So I hope everyone enjoyed my first tutorial from the NEW house! We are loving it so far and I have so so many more fun posts to come. 


Wednesday, January 16, 2013

Organization Station - Office Inspiration

With a new business comes a NEW office... Which means new ways to organize and new creative ways to decorate! Since I will be working from home, a beautiful office is a MAJOR priority. I will be in my home office 90% of the time and want to enjoy my space. I will also occasionally be sharing the space with my hubby which means organization is a MUST. Here are a few inspirations I have been drooling over lately.


Photobucket


Photobucket


Photobucket


We also received some AWESOME {novelty} toy soldier book ends for Christmas this year and I just had to share them with y'all. They are from Urban Outfitters and are seriously PERFECT for my husbands addiction to war related books. I loved them so much that I basically designed the entire office's color scheme around that beautiful kelly green. You will see them soon in my office room reveal! Below are the book ends and a few others that I found along the way...


Photobucket


Photobucket


Photobucket


I will not be using my previous desk (as seen below in my old office). Since the hubby and I will be sharing an office part time, I needed a much larger desk.  


Here are some desks that will be similar to mine (not in shape) but in finish.


Photobucket


Photobucket


Photobucket


Photobucket


Photobucket


So there ya have it! My office inspiration is coming to life:) More to come soon!


Tuesday, January 15, 2013

Introducing... The Creative Cottage!


Photobucket


Over the past few months, I have been working on my biggest project yet - my NEW business. Today I am so happy to introduce to you... Drum Roll Please... The Creative Cottage!! "The Cottage" (as I'm calling it) is your {one stop shop} for all things creative. The bread and butter of the company will be graphic design, but I will also offer interior design services along with some photography as well. You might have noticed a few additions to my blog recently at the Blissful Bee. Like my new page up top that links to the new company, and my new facebook link on my sidebar. Well, this is all because I have slowly but surely been rolling out the new biz. Yupp. That's right. I am officially a small business owner and couldn't be more proud:)


Photobucket


For a long time I have been interested in opening up my own company, but always strayed away for many reasons. There are many downsides that can be quite scary. Things like no benefits, no comfortable/steady paycheck, no co-workers/friends that you get to see on a daily basis... Oh and that whole fear of it not working out! But there are also a lot of good things about owning your own business as well. For example, I might not have a steady paycheck, but the potential is HUGE. There is so much more room for growth, and that's always a good thing. I can also make my own hours and choose what projects I want to be involved in - all good things if you ask me:) Oh, and working in my PJ's isn't so bad either!

Photobucket

So after a few months of debating what I should do, the hubby and I decided to take a leap of faith! Just stop all the worrying and {as Nike says} JUST DO IT. So now what I need all of you to do is check out my website! Stop by my facebook page and "like" it if your interested. I am so excited about my new venture and cannot wait to see how it all unfolds. 


The hubby and I are also finally getting settled into our new home as well! We still have boxes everywhere (which is very unlike me) but we already somehow feel like we're home. Make sure to come back to see my new room reveals and projects for the new house!